Sunday 19 December 2010

We Have Experienced Technical Difficulties

Wow. Sorry. Have been away for quite some time and totally failed to keep this blog up to date or check that the final post for the Jacket to Jumper went live when it was supposed to.

I'll be trying to get rolling again in a few days. A bit has happened, a another bit has also happened and I've been a busy little bee.

xo
Me

Sunday 3 October 2010

Jacket to Jumper - Part 2

Part Two is the hard bit. Those of you who have never sewn before might want to enlist some help with some of the pinning or measuring stages.+

In this step you're going to have to make several decisions about what the final dress will look like - this is why it is a good idea to have a picture or real world example to check. If you don't have a picture or example, it would be a good idea to draw something, just to keep your mind on the goal.

For this stage you will need:


Scissors, pins, a measuring tape, a ruler or yard stick, an iron and something to mark your cutting lines with - I use a bar of soap for this but chalk works, as does white pencil crayon. You can also get special fabric pencils at fabric stores, but I find for most projects a bar of soap works just as well.

At the end of my last post you had this:


Now we need to cut our raw materials into shape. (Step numbers continue from the last post)

Step Three: Turn the jacket over and line up the front panels as though your were going to do it up. Make sure that the jacket is smooth and that there are no wrinkles. If you have not taken the buttons off, do not actually do the jacket up. Done up it will be much harder to lay flat and you will wind up with wonky cutting lines.

Lay the yard-stick across the front, even with the underarms.


Special Note: You should make sure that the centre-back of the jacket is ever so slightly longer than the centre-front (about 2cm). If you leave the front and the back perfectly even, the back will actually be shorter than the front when you put the finished dress on. The jacket should naturally fall into this layout pretty easily and you should still be able to lay it out smoothly. Spend as much time as you need to get it flat and even.


Step Four: Using your yard-stick and the soap, draw a line across the front of the jacket.


From either side cut roughly three inches into the jacket along the line, making sure that you cut the back as well as the front.


Step Five: Open the jacket up and flip it over. Using your yard-stick, draw a line between the two cuts. Some people will want to just cut straight across the jacket after drawing the first line. Don't do this. 1.) You're going to find it hard to cut through that many layers of fabric. And 2.) It is so easy to pull the layers out of alignment. One second you're cutting a straight line, the next, you've cut a curve through the back. I speak from experience.


Step Six: Cut along the lines.


You can set the bottom half of the jacket aside for now. The next few steps are all about making the bodice.

This is the most complicated section of this project and the area that novice sewers might want some help with. If you can bribe someone into acting as a mannequin for you, it may make all the difference. Remember the number one rule - measure twice, cut once. Double, triple, quadruple check everything at this stage.

I've decided that I want it to be clear that my dress used to be a jacket. I'm going to keep the lapels and if possible, the breast pocket, however, I don't like the angle that the lapels sit at normally, so I'm going to re-align them.

Step Seven: Pin the two front pieces together at the bottom. Some overlap is okay but it doesn't have to be very much. Using the iron, press new lapels in.


While you have the iron out, it would be a good idea to press the back piece and pin the lining in place. You'll be working with the back next.


This is where it starts to get really tricky.

Step Eight: You need to measure the bodice. Because I don't intend to faff around putting a zip in this, I have to make sure that it will go on over my head. There are two ways you can do this - measure around the fullest part of your bust and then make sure that your two bodice pieces add up to that amount, hoping that the front is wide enough and the back narrow enough and trying to figure out how much extra you need to add for comfort and removal. Or you can do it my way and cheat.

Cheat Method:

Either on your own, or with help, measure around your back. You can do this by tucking one end of your measuring tape under your arm at bra-band level, holding the tape in place with your arm and bringing it around your back to the same spot on the other side. This will not only give you your back measurement, but it will include enough extra to make sure you can still get the dress off as well as your seam allowances.

Step Nine: Lay the back piece of the jacket out by itself. Divide your back measurement by two. My measurement was 51cm so my new number is 25.5. Find the centre back seam of the jacket and put your new number on this seam.*


Mark, with soap, the 0 and 51 cm points.

Step Ten: Lay the yard-stick along the top of the back piece and line it up with the lowest edge of the old shoulder seam.


Draw a soap line along this point. Now lay the yard-stick at right angles to this, lining it up with the marks you made at 0 and 51 cm (or whatever your measurements were.) Cut along these lines. You should now have a rectangle of fabric. This, with a few final cuts, will be the back of your dress.


Step Eleven a: Flip the back piece so that the lining is on top. Lay the front piece over it, lining up the centre back of the lining with the centre front (this is where the lapels cross). Pin at either edge in line with the front armhole. Make sure your pins are pointed in the same direction as the armhole.

Once both sides are pinned, unpin the centre front.


Step Eleven b: If you have a helper, put them on standby. The easiest thing to do at this point is make sure that you are wearing a tank or vest top, the kind with proper all-in-one-piece front and shoulder straps, not stitched on elastic spaghetti straps. Wrap the pinned bodice around you, pinning the front closed. (If you put the pins in the wrong way, you will be stabbing yourself about now.)

You can let the back flop over, but you should pin the front panels to your shirt so that it stays where you would want it to be if you were wearing it. You do not need to worry about pinning the shoulders together - you will be adding straps later so move the pieces around as much as you need to until it is sitting where you want it. The bottom edge of the bodice needs to be about two or three centimetres below your bra band, so keep this in mind when fitting. If you don't have a helper, use a mirror to get this part right.

Either you or your helper should now mark the underarm curve. Trace this along the line of your tank/vest top on one side. Unpin the bodice from your shirt and do a test over your head removal. If you can't get it off, play around with the pins at the centre-front and sides until you can. This is the last chance you have to get this right so it is worth spending some time on.

Step Twelve: Unpin the back from the front and lay it out on the floor again


Cut along the underarm line you drew


Lining up the cut off piece with the shoulder seam on the other side, trace another underarm line.


Cut this off as well. You should also trim the edges of the front off in line with the original underarm seam.


Step Thirteen: Lay the front over the back, with the lining sides together. You will probably need to fold the back a little in order to line up the edges.


Trace along the edges of the armholes using soap. Then separate the front and back again.


Trim off the excess.


Phew! That's it for Step Two of the Jacket to Dress makeover. You've got the bodice cut out and ready to go. The skirt you set aside. Next up the the final hurdle - putting it them together.

+If you have a sister who is about your size I can recommend making her stand with her arms at shoulder height for several hours. She will love you for it.

* If your jacket does not have a centre back seam, you need to fold the back piece in half and press it. The crease is your centre back.

Friday 1 October 2010

Jacket to Jumper - Step 1

For makeover number one, I'm going to turn a second-hand suit jacket into a dress. I'm going to break the project into three separate posts.

This isn't a simple project, but I wouldn't class it as advanced either. Sort of middle-grade. If you've never sewn anything before, take it slow and always double check before you cut anything. The number one rule of sewing is the same as carpentry: measure twice, cut once.

With any makeover, it's a good idea to know what you want the end result to look like. Unless you've been sewing for years, or are really good with visualisation, find a picture or real world example that you can use to check your progress. I've already got an A-line dress that I love so I'm going to try and use it as a template.

This:

Into something like this:


IMPORTANT:

You should make sure before you do anything that the jacket is long enough. The original jacket I purchased for this project was a bit too short, so I went back out and spent another whopping £3.50 on a longer one. If I had tried it on in the shop, I wouldn't have needed to do this.

Compare:

Neither jacket is long enough as it is, but the three or four inches extra on the second one will make the difference between something I will be comfortable wearing and something that will have me tugging at the hem all the time. This is going to be a personal choice. I prefer longer. You will be able to add a few inches to the length in the reconstruction, but when in doubt, and if possible, get one that is longer than you are aiming for.

Okay, here we go.

For stage one you will need a seam ripper, a pair of scissors, a suit jacket and a glass of wine (optional). I estimate that this first stage will take about an hour, longer if you haven't used a seam ripper before.


The first step is to take your raw materials and break them down into their component parts.


Step One: Using the seam ripper, take the sleeves and the collar off the jacket. If the jacket has shoulder pads sewn in, take those out too. Remove any buttons. The collar of the jacket probably has a felt backing, make sure that you take this off the jacket along with the collar. It doesn't matter if you manage to do this all in one piece or not as long as all of the neck area is clear.


Set the sleeves, buttons and collar aside for now. You will be using them later.

Step Two: Using the seam ripper, open up the shoulder seams of the jacket and trim any excess lining to match the outer layer. You can throw these extra bits away.


Check to make sure that you have removed all of the felt padding in the shoulders. When you have opened the seams and trimmed all the excess you should have something that looks like this:


That's pretty much it for Stage One. You can leave the side seams and the rest of the lining intact. (Told you it wasn't going to be too difficult.)

One other note:

Men's suit jackets tend to have an inner-lining and, for lack of a better term, what I'll call the normal-lining ( I was going to call it the main-lining, but it sounded weird). Most jackets only have an inner-lining at the front. It's a loosely woven starched fabric that helps keep the jacket looking sharp. You can leave this in if you want. It isn't going to make your job any more difficult later and it will help give the finished dress more structure. If you don't want to leave it in, I would suggest very carefully cutting it out, staying as close to the seam between the outer fabric and the normal-lining as you can. It will be much more hassle to un-pick the stitching, pull out the inner-lining and then re-sew the lining onto the outer layer later.

In Stage Two we'll be measuring and cutting.

In Stage Three we'll be sewing everything together.


Friday 24 September 2010

And The Winner Is....

The Dress!


With two blog comment votes, one vote on Deadwood and one email vote the dress wins! I'll be starting the project this weekend so keep an eye out for updates.


However,


There were two Facebook votes and one comment vote for the vintage jacket, so I'll do that one second. (It was also my fave idea so I'm kind of cheating.)


Friday 17 September 2010

Makeover!

I make a lot of my own clothes. More frequently, I make new clothes out of old clothes. Recently I bought this:
It's a men suit jacket, size 41 (£3.50! Go charity shops!). Originally I was going to make a sort of A-line pinafore dress out of it, but then I started thinking of all the other things I could make and now I can't decide. I could make the dress, or I could simply alter the jacket to fit me and have a nice pinstripe jacket for work; or I could cut it a bit differently, to a vintage design and have a vintage style coat for work. I could turn it into a warm winter-type jacket, a shirt, or abandon clothes altogether and make it into a laptop bag or a shoulder bag. This is where you come in: I want you to vote on what I should make this jacket into.

Whatever I make I'll document the transformation here, with instructions. Call it the first in a series of tutorials in Makeover fashion. Some of the options listed above are pretty complicated so I'm going to give you three choices:

1.) A dress
2.) A vintage-style jacket for work
3.) A shoulder bag


Voting closes one week from today at noon GMT.


Monday 13 September 2010

Flexicado Review

Hand me a ripe avocado and some balsamic vinegar and I’ll happily give the last piece of banoffee pie to Great-Aunt Mildew. So I think the Chef’n Flexicado is a great idea. With it I can slice those babies quickly and get them on my plate–without turning my succulent snack into guacamole. No need to peel, no need to worry about timing. Just slice it open, bin the pit and in two minutes you can be eating.

At least that’s the theory that the marketing people have used to brainwash me. In practice the flexicado is… well to be honest it’s crap not bad actually….on the third try.


Wrapables.com* has this to say:


Simply slide the slicer's flexible head through an avocado half, and in one smooth motion, you can easily create 8 perfect segments


Amazon.co.uk * says:


This flexible slicer is ideal for preparing avocado. Simply cut the fruit in half and one scoop removes the flesh and slices it at the same time. It is made from nylon, which is firm yet flexible and works on any size of avocado.


The first time I tried it, I think that the avocados were too hard. At least, I blame the fact that I couldn’t get the flexicado to make a dent in the advocado on being too eager to try it and not waiting for the avocado to ripen. Ok fair enough, rookie mistake.


The second time, I tried it on a very small Haas avocado and blamed the failure on the size difference.


So far, so Failcado! I'd tried it twice and both times it had let me down. Things were looking bad.


I probably should have suspected some difficulties from the promotional images (courtesy of the Chef’n blog - http://chefnblog.com/ ).


You have this:

Then this:


And then, magically:


Nothing to show the journey through the middle - and no tips on ripeness.


I decided to give it one more chance. This time I was ready.


The avocado was ripe: nearly a week on the kitchen window had prepared it.


It was the perfect size: I’d carefully measured it in the shop.


My tools were ready: I'd sufficiently flexed the flexicado to warm it up and be sure I could do this final trial justice - I even had an audience: the lovely S having been invited for dinner and then bullied into taking photos* - nothing but fun when you come to my house!


I sliced the fruit open, de-pitted it and lined up the flexicado.


Started smoothly:

Had a nice trip through the middle:


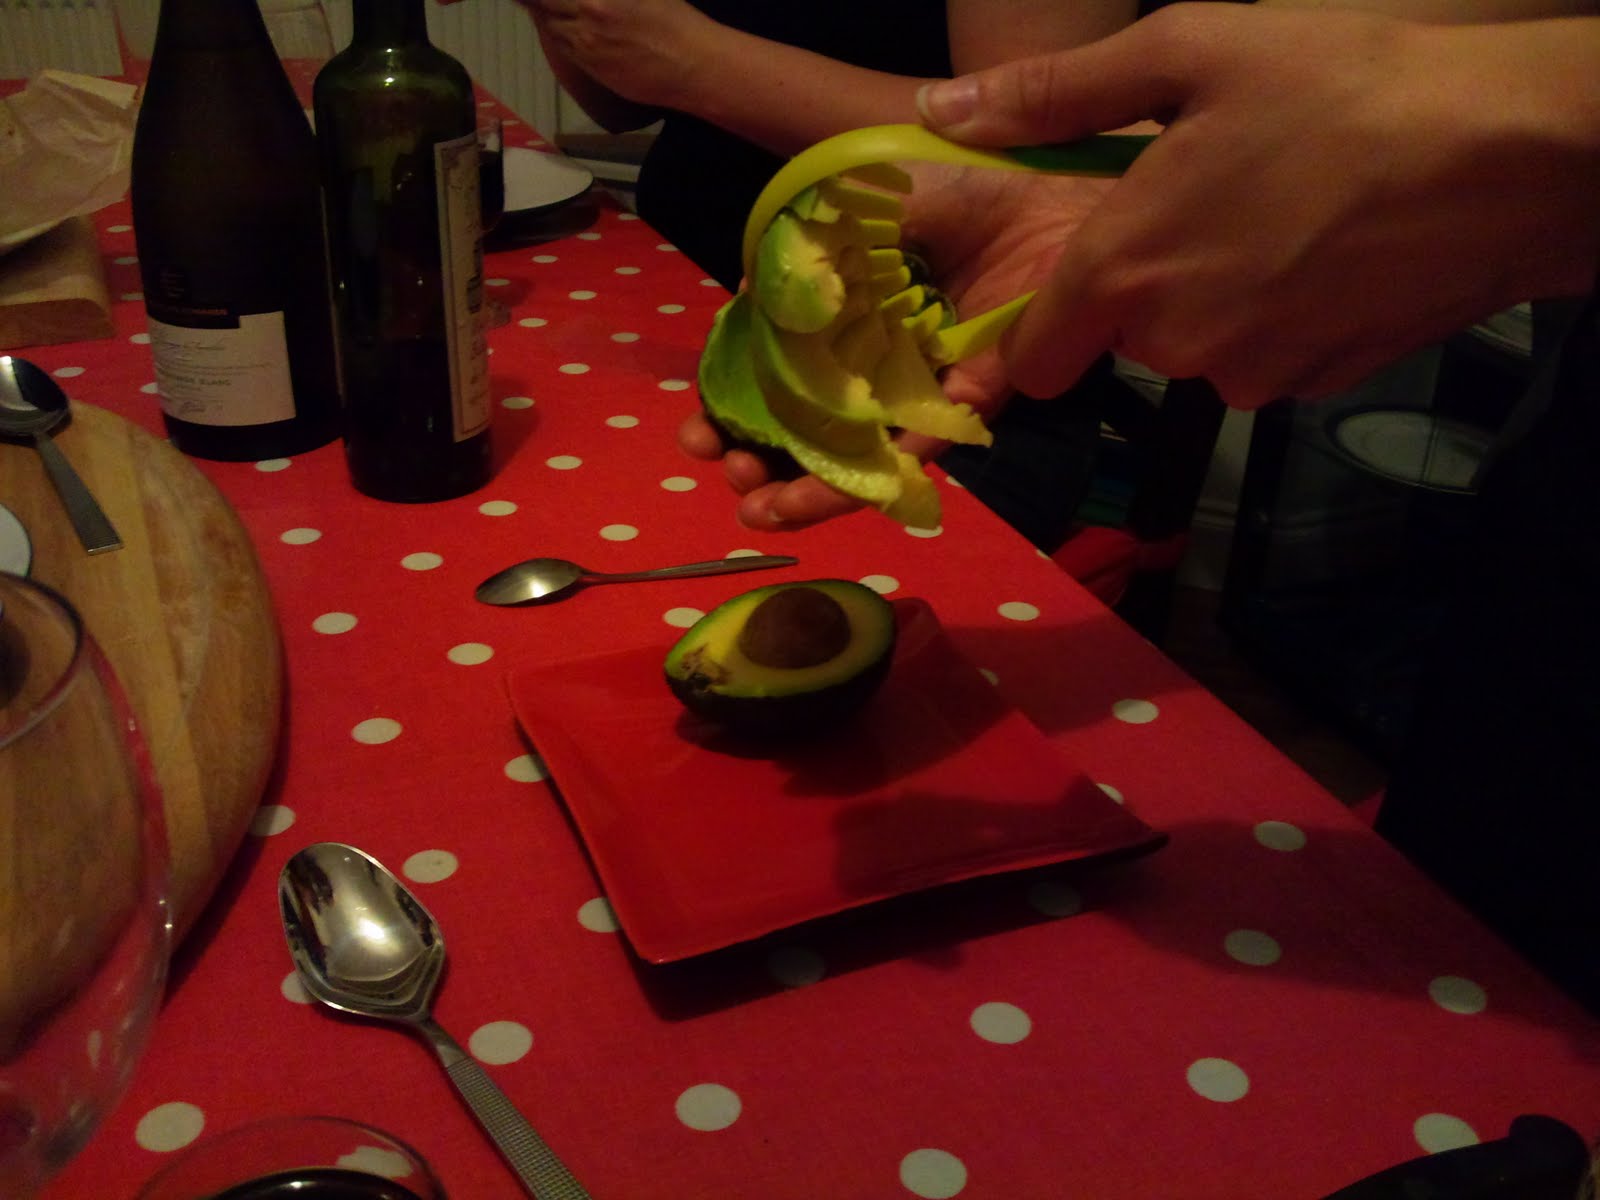
And though getting it out at the end was tricky, all in all not bad. Result:


Even better with balsamic.


Overall Score: 6/10


Food Presentation: 6.5 out of 10 Result was a bit mushy (-1 point), but not bad form-wise. Slight hiccup getting it to let go of the slices at the end though (-2 points) –could muck thing up if culinary perfection is your watchword. Quite a bit of flesh left in the skin too.*


Waiting a few extra days for the avocado to ripen resulted in a rather unfortunate texture change, and was not really all that enjoyable taste wise – even with loads of balsamic. Now, to be fair, I waited a LONG-ass time to slice this avocado. Normally I wait two, maybe three days max before eating them – not a week as I did here. I suppose in a tricolour salad or mixed with other things the taste and texture might not be as noticeable or as offensive so I’m only taking off half a point for this (-0.5 points).


Ease of use 8.5 out of 10. Once I got it started it does slice through the avocado easily. You definitely need to give it a good flex beforehand though to make sure that it fits your particular avocado and that you are using it on a properly – perhaps almost over-ripe fruit (-1.5 for the extra warm up) I’ve already taken off 2 points for the problems I had getting the slices out of the flexicado so won’t take off any more here.


Wash up: 10/10: This thing goes in the dishwasher. Mine came out nice and clean. This is an easy point gain. Basically, if you can put in in the machine and it comes out clean, it gets 10, if it can't - 5 at most. I hate dishes.


Penalty points: -2 for failed attempts. An object like this should be idiot proof. I'm frequently an idiot. Three tries to get it to work is two tries too many.


All this testing has me thinking though - the Flexicado is essentially a one trick pony. There must be some other uses for it. Stay tuned.


*They sell the flexicado. They have nothing to do with me.


*They also sell the flexicado and I only wish they had something to do with me.


*Not really - S isn't bully-able, she's just great.


*This may be down to user error – I’ve only successfully used this thing once but I would be disappointed if this was the standard result. I went back to the skin afterwards and could scrape out a decent portion with a spoon. Bit of a waste.

Wednesday 1 September 2010

Things You Cannot Name a Dog

I was having a conversation with my father last night. They are thinking of getting a new dog. We discussed the where and the how and the when and even though nothing about the actual purchase of said dog has been decided, and the entire conversation was only theoretical, we then moved on to the most important question of all: what to name it.

Earlier we had been talking about the rules of the English language (my dad and I frequently have this kind of conversation. Some people take their kids fishing, my Dad talks to me about rules of syntax and diction. I like it this way.) We became fixated on the fact that there are some rules that we simply cannot explain. For example: I can say 'the long, thin, metal rod' but saying 'the metal, thin, long rod' sounds wrong and I automatically reject it as an option when deciding word order. Why? What is the rule that governs this? How does my brain know that 'long thin metal rod' works but the other options don't when no one has told me what the rule is? I can't sufficiently explain it and neither can he. But we both know that the words belong in a certain order and we will always follow that undefined rule.

Back to the dog discussion.

In the same way that there are word orders that are correct and word orders that we reject, there are some things that you simply cannot name a dog. Not without it being strange. Why is this? What rules govern the naming of dogs and why is it weird to name a dog Jason? Not that my Dad wants to name the dog Jason. He just wonders why he can't. The problem boiled down to three basic points:

There are some names that work for dogs that don't work for people, like Spot.

There are some names that work for both people and dogs, like Max.

And then there are people names that simply do not work for Dogs:

Gregory.

Ruth.

Michael.

Think about it. You have a dog, some kind of spaniel maybe. A nice dog, maybe a bit drool-y and he chews your shoes, but he's sweet. You introduce him to a friend and you say; 'This little guy is Robert. We got him from Animal Control.'

No.

Bob works - I know of a lovely Bob-the-Dog, but Bob isn't short for Robert. Max, Rex, Heather, Rosie, Holly, Abbie, Angus and Norman work. So it isn't a rule against giving animals people names. Some people names simply don't compute. Robert, as a dog name, doesn't work. Neither do Susan, Anita, Peter, Maria, Anthony, David or Tracy.

Seriously - can you picture yourself in a park shouting 'Peter! Peter come back here! Get away from that duck!'

I can't. It seems silly and I would never name my dog Peter.

Why?

We talked about it for awhile and could only come up with vague boundaries - things that are not part of the rule but which help narrow it down:

- It has nothing to do with being able to add an 'ie' to the end - Ruthie and Suzie don't work any better on a dog than Ruth or Susan, though they both work for people.

- More formal versions of names are not automatically out - both Michael and Gregory are out (as are Mike and Greg) but Max and Maximilian work (though we conceded that Maximilian might only work on some dogs - probably a sheepdog).

- Traditional names sometimes work and sometimes don't: you can't call a dog Edmund, Edward, Timothy or but you can get away with Arthur and Norman.


My father has decided that as he cannot explain the rule, he's going to flout it. The current front runners for the name of the new dog are Gary and Elizabeth. My mother, who has no choice but to take part in these conversations when they happen, is angling for Harriet or Susan. The decision on 'to dog or not to dog' seems to have been decided in favour of 'to dog'. All because you can't name a dog Gregory.

I'll let you know how poor Gary/Elizabeth/Harriet/Susan gets on.

Things That Baffle Me - UPDATE

I mentioned my parent's electric pepper grinder awhile back - the one that offends me by having a light on it.

I've been reliably informed that they had to get rid of it.

Not because the batteries died, not because the light went out. Nope.
They had to get rid of it because there is nowhere to add more pepper.

Tuesday 17 August 2010

Jane! Get Me Off This Crazy Thing!

I’m not sure how I feel about ‘Fast Fashion’ anymore.

Fast Fashion means that we can all be on the cutting edge of fashion if we want to be. It also means that we are all on the cutting edge of fashion if we want to be.

Why is this a bad thing I hear you ask?

Well, to put it simply, no-one knows how to dress themselves anymore.
I’m not talking about some tragic loss of manual dexterity that means we are all walking around with our trousers undone and our heads up our sleeves, but a much more fundamental loss: a loss of individual style.

Sure we all have a great pair of jeans or a fantastic party dress, but we all have the same jeans and the same party dress. We have drawer after drawer (or in my case pile after pile) of one-hit wonders. Clothes that were in for a minute, but went out just as quickly. High-waist jeans? Braided leather belts? Breton stripes? I’m not wearing any of these anymore but I bet I can find them stashed in a bin bag somewhere ready to go to charity. I also bet I didn’t pay more than £9.00 for any of them.

Don’t get me wrong. I’m not standing on some high moral ground surrounded by Harris Tweed and Hermes handbags; I’m as guilty of succumbing to Fast Fashion as anyone else. I sort of love that I can read about the new trends at fashion week and get it in the shops almost the next day - at a fraction of the cost of the real thing. What I don’t love is that I only get to wear it once because it falls apart the first time I try to wash it, or that the fabric doesn’t breathe and even though my outfit is the latest thing, I look horrible because I feel like I’m trapped in a Bikram Yoga studio. The real problem for me though is that before I can really wear in my new pair of shoes/jeans/jacket/whatever, and get them really comfortable, I abandon them for the next new thing. I never feel comfortable in any of it. I always feel like I’m wearing someone else’s new clothes. I never feel like me.

Grace Kelly had access to any designer she wanted, whenever she wanted. But she also kept the same style of Hermes bag for most of her life and rarely discarded old clothes, often wearing her favourite pieces several times. The gown she wore to accept her Oscar, was the same gown that she wore to the premier of the film a year earlier. Can you imagine that happening now? Can you imagine any Hollywood actress wearing the same dress to two red carpet events a year apart and not getting ripped apart by the press for it? Kelly wore things that suited her, wore them repeatedly and over a period of several years. That’s Slow Fashion. That’s style.

Fast Fashion is like Fast-food and recently, for me anyway, it has taken on the same negative connotations. Cheap, in every sense of the word, Fast Fashion is quickly forming its own
Pacific Gyre, a vortex of polyester/cotton blended knits, smelling faintly of cheap perfume and Axe body spray.

I was wrong. I do know how I feel about Fast Fashion. It doesn’t make me happy, it doesn’t make me a better person and it certainly doesn’t help my bank balance.
Maybe it means I’m getting old, or maybe it means I’m falling off the style radar once and for all, but I’m getting off this crazy gyre and going to join the Slow Fashion movement instead.

I’m going to buy things that will still look good next month and will last until next year, or for the next five years. I’m going to think about what I already have in my closet (read: pile on the floor) before I buy something new: if it doesn’t go with at least two things, I’m not buying it. I don’t think I need 7 pairs of black stilettos. I certainly don’t need 6 pairs of red shoes. And I really don’t need 15 white t-shirts with slightly different sleeves. I just don’t.